Categories

Tuesday, January 29, 2013

UPDATE

Just an update to let everyone know what's going on.
When I first started this blog, I'm pretty sure I updated it daily and felt like I may have been a bit overwhelming. Now it's been about a week and I haven't posted anything!
The funny part is, is that I have a bunch of posts in my drafts all ready to go. The problem is, I can't seem to see them when I go to edit them.
SO once I get that figured out, I promise I'll post more. And I will post them at a nice interval of one every other day or so - instead of all at once.
I'll probably do something totally cheesy like:

  • Make it Monday - A day for crafts.
  • Wear it Wednesday - I'm not much for styles, but I do get excited over good clothing finds every once in awhile. Also this will contain D.I.Y. clothing, instead of filing it under crafts.
  • Food Friday - This is pretty self-explanitory. Everything baked, cooked, boiled, sauteed, toasted, etc. This also includes restaurants and new foods reviewed.
  • Funday Sunday/Seen it Saturday - Not sure about the title of this one, but this will contain concerts, movies and other activities.

Here are some posts you can look forward to:
  • Adult lemonade
  • PBBPC sandwich
  • Eight o'clock coffee/s'mores creamer review
  • 104.5 Winter Jam concert
  • Chinese dragon puppet
  • Neopolitan brownies
  • T-shirt dress

Tuesday, January 22, 2013

GAME: Impossible Puzzle

Since I seem to be labeling all my posts, I couldn't figure out what kind of category puzzles fell into. Games, I figure.
Anyway, I love puzzles. Really. They keep me entertained and make me feel like I'm exercising my mind. I am really good at puzzles. I have this kind of puzzle super power... but I won't brag... (Okay, I'm bragging.) I can look at the puzzle for a bit, and then look at the pieces and the first piece I pick will go into the first spot I put it. I know, what a dumb "super power." I wouldn't say I am good enough to go into some sort of puzzle making championship though.
When I was younger, I would do puzzles all the time but I would put them together "backwards." I would do them from the inside out. Most people will start with pulling all the edge pieces and creating the border, but I would find similar colors and work from there. I wanted to see the picture, and starting from the outside just didn't seem like the logical thing to do. My mom and I also did those mystery picture puzzles a lot, so without having a guide on the box cover may also be a factor as to why I can complete puzzles rather quickly.
Needless to say, I was very excited when I came across a puzzle that seemed to be a bit more challenging than the average puzzle.

Bepuzzled's Impossibles "Book Smart"

Bepuzzled has a line of puzzles that they call "Impossibles." They have no border and they have five extra puzzle pieces. Of course if it wasn't already awesome enough, the picture is just a bunch of items repeated, so everything looks the same. AND if that wasn't enough for you, once you piece the puzzle together, you have to find the hidden picture. This puzzle, it's a hidden diploma, and I stupidly crushed the puzzle before finding it.

The finished product.

The puzzle took only a few hours over the span of 3 days, and there were two people working on it. We did not take into consideration how very large the finished picture would be, so when I finally got the top together, I had to improvise. See the chair extending the table in the picture above?
The five extra pieces were pretty easy to find for the most part. We found two almost right away.

The extra pieces.

I really hope to come across another puzzle like this one in the future. It was a ton of fun, although frustrating at times, definitely worth it in the end.

Sunday, January 20, 2013

FOOD: Puppy Chow

Most people call it Muddy Buddies, I call it Puppy Chow. No matter who's making/eating it, it will always be known as the yummy nostalgia inducing peanut butter, chocolate, Chex mix snack from childhood.

Here's what you need:

  • 9 cups Chex cereal (rice or corn)
  • 1/4 c. butter or margarine
  • 1/2 c. peanut butter
  • 1 cup chocolate chips
  • 1 tsp. vanilla (not pictured)
  • 1 1/2 cups powdered sugar
Nine cups of cereal is a just under using the entire box. I just happen to use the entire box because, well, I can do that being a grown up and stuff.

Pour your Chex into a very large bowl. 

A whole box of rice Chex.

In a separate, microwave safe bowl, add chocolate chips, peanut butter, and butter. 

Using a large measuring cup will come in handy when pouring later.

Microwave on high for 1 minute. Stir. Microwave an additional 30 seconds or until smooth. Add vanilla.

Melted chocolate and peanut butter.

Pour chocolate mixture onto cereal and stir until evenly coated. At this point I usually grab a second bowl and split the cereal in half. It makes it much easier to coat all the Chex. I also try really hard to stir with a spoon, but end up using my hands.

Pouring with one hand, photographing with the other.

Almost done!

Take your powdered sugar and mix into the cereal. Make sure it coats each and every little chocolaty piece. You can take the cereal and put it into an extra large Ziplock baggie, pour in the sugar and shake, OR split it into two large bowls and mix (exactly like coating it with chocolate).

Do not pour sugar all over your floor.

Nom nom nom. Easy snack, fun to make, fast to prepare.
If you are interested in more Chex cereal recipes, their website is full of sweet, salty, and gluten-free snacks!

Messy but delicious end result.

Saturday, January 19, 2013

FOOD: Spaghetti and Mussels

I am never a fan of leftovers. I love eating something new for dinner every night, but that makes for a lot of leftovers for me and often they end of going uneaten and spoil (maybe I'm the one who's spoiled!). I try really hard to find a way to revamp the flavors in a leftover meal, whether it be a simple adjustment or creating something new (e.g. using leftover grilled chicken on top of a salad or a sandwich.)
Anyway, a few of my friends and I went out last night to one of my favorite breweries, Victory Brewing Company. My boyfriend went to school in the area and his classmates introduced it to him.
We went out to dinner and I got spaghetti and mussels in a spicy marinara sauce. It was delicious, but by the time the main course came out I was stuffed with beer and appetizers.  So of course there was plenty of leftovers for me to eat today!

Spaghetti in a spicy sauce and mussels.

Mussels are fairly easy to cook. You can simply bring a cup of water (or partial white wine) to a boil, add mussels, cover and steam for 5 minutes until the shells have opened. Do not eat any unopened mussels, it means the mussel is dead and could end you up in the hospital if eaten. However, I've never had to reheat mussels before, so to the internet I turned!
I read that you can reheat them however you want; microwave, saute, so as long as they don't get too hot because they get chewy.
I really wanted to saute them in some extra tomato sauce because the spaghetti was overly spicy - I couldn't even taste the spaghetti, all I tasted was cayenne. We unfortunately didn't have what I wanted. Boo....
So I had to improvise!


Mussels and cocktail sauce.

I shelled the mussels and threw them into a bowl with a few large spoonfuls of cocktail sauce and heated them in the microwave about 30 seconds on high covered. 

Shelled mussels.
In cocktail sauce.

The mussels were delicious just sitting in the cocktail sauce, but I stirred them into the pasta instead. Added a little fresh basil (from my awesome herb garden) and Parmesan cheese and it's perfect!

Before the final touches.

For dessert? Hopped Up Devil ice cream. 
Victory makes ice cream from the wort of their beers. The wort is the pulp of the malt, but before the hops and fermentation process (no alcohol). Storm King Crunch - Chocolate ice cream and chocolate malted milk balls. Triple Monkey - Banana ice cream with caramel and peanuts.  Hopped Up Devil - Vanilla ice cream with cinnamon, cayenne, and chocolate covered coffee beans. YUM!
Clockwise from top: Hopped up Devil, Storm King Crunch, Triple Monkey.

Thursday, January 17, 2013

FOOD: Chocolate Crack

My friend Rachael is an honorary roommate in my apartment. She comes over very often to hang out, but the deal is that when she comes over we are usually trying something new; craft, puzzle, alcohol, or baking.
This time she came to me with a recipe she called "Christmas Crack." I figured she was talking about a chocolate peppermint bark, where you melt down some white and dark chocolate and swirl it together, spread candy cane pieces over the top, and voila! Bark!

Peppermint Bark

Instead what she was talking about was the ever so delicious chocolate, toffee, cracker combination. This tasty treat is the perfect combination of salty and sweet, it tastes very similar to a chocolate covered pretzel. I guess the recipe Rachael found, the OP only makes around Christmas time, ergo its name, but I feel it's the perfect anytime treat. Even my picky eater roommate gives his approval to this recipe!
This snack makes me very nostalgic because my mom and I used to make it for parties and school events. I'd lay out the crackers while she worked on the stove. The recipe is surprisingly simple, you only need FOUR ingredients, and the kids will love to help!
After we made our first batch (we made two because it gets eaten extremely fast), Rachael and I just started calling it "Crack" for it's delicious addictive-ness and for the method in which you crack the sheet of chocolate into pieces.

Yummy, delicious, addicting Crack.

Gees, I talk too much. Why didn't you stop me!?

Here's what you need:
Yes, that's a Hello Kitty toaster!
  • 40 Saltines (You may also use matzo, club crackers, or another cracker of your choice)
  • 1 cup (8oz) unsalted butter (no margarine)
  • 1 cup packed brown sugar
  • 2 cups semi-sweet chocolate chips (we found that the mini chips worked best)
Start off by lining a baking sheet with aluminum foil and then greasing the pan with a non-stick spray.
Line the baking pan with saltines. Make sure they are as flat as possible and all parts of the pan are covered You may need to break the crackers in half to fill in gaps.


Melt the butter in a sauce pan, add the sugar and bring to a boil.

Waiting for a boil.

Once it's boiling, lower the heat and simmer for about 4-6 minutes until the sugar has completely dissolved and mixture begins to thicken.
EDIT:: We made a third batch today (Jan 18) and used margarine instead of butter. The taste was very similar but the main differences in the toffee was the margarine made it much crunchier and sticky (like pull out your fillings). It was still delicious, but we preferred the butter. It also took a longer time for the sugar mixture to thicken. I kept turning up the heat to help expedite it. If you choose to use margarine instead, keep an eye on the mixture while boiling. Pour a spoonful of toffee back into the pot to test the consistency. If it runs easily, it needs to be cooked more. If it starts to slow down a bit, like a liquid caramel texture, you got it right!

Thick and bubbly.

Pour contents of saucepan onto crackers and quickly spread the toffee around and cover all parts of the crackers. This is important because the Crack is just not the same without a bit of cracker, chocolate, and toffee in each bite!

Pouring the mixture.

Bake at 350°F for 8-10 minutes until it begins to bubble. Be careful and watch it so as not to burn the edges.

In the oven.

Remove from oven and immediately sprinkle chocolate chips on top.

Pouring the chips.

At this point we tried to spread the chips, but they need a moment to melt.
Once the chips begin to melt, use a spatula or the back of a spoon to evenly spread the chocolate across the crackers.

Spreading the chocolate until smooth.

Place the baking sheet in the refrigerator and the wait begins.
Once the chocolate has hardened, take it out, break it into pieces using a mallet or just bending it by hand. We used gloves because the chocolate tends to melt under the warmth of your hands.

Straight out of the fridge.

Consume all of the crack in one sitting and don't share. Okay, so I don't recommend eating it all at once, but it certainly seems plausible once you try it.

Monday, January 14, 2013

CRAFT: Book Binding

So I went to my friend Emma's house a few days ago because she offered to teach a few of us how to bind a hard cover book. She learned a few different techniques and styles of binding in school, so it was very exciting to have a "professional" teach us.

Our lovely teacher! <3

I had learned how to make a simple book in first grade and when Emma asked us to come over, I was very excited to make another. I went in with low expectations, thinking the process wouldn't be very difficult (because, well, first grade me could do it, why can't "twenty-something" me?)
That was a mistake.
Emma had us cutting precise measurements and gluing and sewing and I don't remember doing all that in first grade... I'm pretty sure all we did was pick out the paper for the cover and glue it onto some cardboard... But the way we did it with Emma was much more in-depth. That's what I get for having a professional!
To help us get started, Emma had already cut the out the board for the cover. It is made from a heavy duty cardboard called "Binder's Board".  She also prepared the internal pages called a Signature. It consisted of 8 pages or four sheets of paper folded in half.  Thank god she did that because we would have been at the table all night!

Book making supplies:
Two sheets 12x12 paper, one signature, two pieces of binder's board 4x6 inches
1. We began by taking the paper to be on the outside of the book and measured 0.5 in. around all sides of the binder's board. The total length of the page was 11.25 in.
Measuring around the boards
2. Next we cut a 6.5 x 1.5 in. piece for the spine of the book. We used the same color as the outside of the book.
Cutting papers

Now that all seems simple enough but for some reason the we just couldn't figure it out. We wasted a good amount of time trying to get our measurements correct and even cutting the pages was a pain! There were four of us making the same kind of book and sharing the utensils for about two people. At one point we got a good flow going and rotating the supplies, but up until that point it was a bit chaotic.
3. We then cut out the paper to cover the inside of the book. Unfortunately I can't remember the measurements for the inside.
Measuring the internal cover with a template.

And then finally... after all the crazy measuring and measuring and remeasuring again... We got to the gluing! We didn't have the correct "official" book making glue (called PVA), but we used Elmer's craft glue sticks and it worked very well. I happened to get glue all over my fingers, but it was tons of fun!

Gluing 
4. First we glued the boards to the inside of the paper. Flip the paper over and smooth the outside with the flat edge of a knife or a bone folder. Move in circular motions so as to not push  all the glue out from the sides.
5. Next we folded over the edges of the paper and glued them down. To get a nice clean corner you could fold the paper two different ways. Two of us folded down the corner of the paper first and the other two girls cut out the corners of the paper. We then folded and glued the lengths of the sides. Both corner methods worked very well. (Boy writing this is just as confusing as making it!) 
Folding down the corner.

The sides all folded and glued.
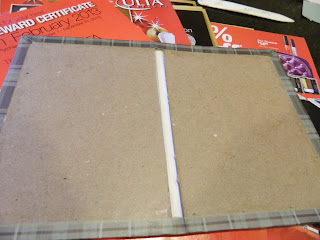
6. We then glued the center strip onto the spine and on top glued the inside cover pages and let it dry.
External paper and center strip.

The finished cover.

Then (in my opinion) the easy part - sewing! Because gluing and getting the paper to stick and lay flat was freaking hard!
7. We placed our pages on the inside of the book, measured a half inch from the top and bottom of the signature, and then "eye-balled" the center and marked all three spots in pencil. 
8. We held the pages very still and poked holes through the three marks right through the Signature and the cover of the book. 
Poking holes.

Then to help make more sense of the stitch, Emma labeled the holes (from top to bottom) A, B, and C.
9. The threaded needle went through the middle hole "B" first, from the outside to the inside of the book.  Then up and back out through the A-hole (much giggling ensued), down along the edge of the spine into C, and then back out through B. (Confused yet?) 
10. We then tied together the string ends that were left over on the outside, closed the book flat, and left it alone to dry.
Finished binding!!!

I must note that while it was drying, we placed parchment paper between the cover and the Signature to help absorb moisture from the glue, as well as we weighed down the books to help them dry in a closed shape.
After allowing it to dry for about an hour (and going upstairs to make some yummy snacks) we came back and decorated our books with stamps, markers, what have you. I left my book plain, because I like it that way; no decoration except for a date stamp.


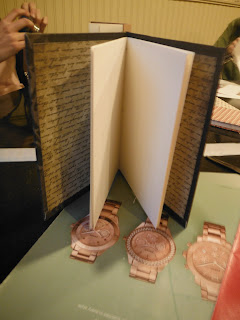
The finished product.

It was tons of fun and I'm glad to have had the opportunity for such an awesome new craft. I might even attempt to make one on my own - UNSUPERVISED!!! Maybe punch larger holes and bind with a ribbon?


I hope whoever is reading this understands my nonsense. I guess I should have chosen an easier craft as the first step-by-step instructions I post, but I promise there will be some way better ones to come. I'm learning of course! Learning how to make books and how to explain crafty instructions.


Monday, January 7, 2013

MUSIC: Twenty One Pilots - Vessels

The strange album art 

So since I do not have any crafty ideas or foodstuffs I want to try just yet (and because I'm excited to try this whole blogging not reblogging thing), I thought I'd review the most recent CD I've gotten.

Vessels by Twenty One Pilots

I fell in love with them the moment I heard "Holding On to You" on the radio. I quickly went home and looked them up online, then proceeded to watch many, many Youtube videos of their songs.

They have a very unique sound and very powerful lyrics. When I first heard it I couldn't pinpoint what kind of music genre this brotherly duo would fall into. They are a combination of alternative rock, a bit of electronic, and rap. A strange combination it seems, but each song falls perfectly together. Their website defines the sound as a "distinctive fusion of piano-driven schizoid pop and lyrical uplift."

I received Vessels as a Christmas promise (since it was not released until January) and I tried very hard to contain my excitement. When I finally listened to the CD, it did not disappoint.

The T-shirt that came with the CD

The CD contains many of my favorite songs including "Car Radio", "Guns for Hands", and "Holding On To You." I was disappointed it was missing "Kitchen Sink", but they made up for it with an adorable new song I'm loving, "House of Gold". In the song a mother simply asks her son if he will take care her when she gets old.

One of my favorite things about Twenty One Pilots is the empowering lyrics in their songs. Many of the songs are about someone's life struggles; something everyone can relate to.

For example:
You think twice about your life
It probably happens at night, right?
Fight it, take the pain, ignite it
Tie a noose around your mind
Loose enough to breathe fine and tie it 
To a tree tell it,
You belong to me, this ain't a noose
This is a leash and I have news for you
You must obey me! - "Holding On To You"

Or much simpler:
I know it's dire, my time today - "Car Radio"

Or even more:
Don't leave me alone... - "Kitchen Sink"

Often when I get a new CD I will listen to it all the way through, then go back and play the songs I'm familiar with a few times, then again listen to it from the beginning and skip the songs that I don't like as much. This CD is different. I keep listening to it from the beginning. I haven't found a song that I want to skip. It really is an amazing album!

INTRO

Recently I decided to delete my Facebook.

There were three main reasons behind this:
  1. I hardly ever use it.
  2. I am tired of the high school like drama surrounding the people on it.
  3. But most importantly, I feel I have lost contact with a lot of people I used to talk to. I have this idea that creeping on people's profile pages is what has led to this disconnection between myself and others.
    • Think about it... Say you are cleaning your room and you come across a book you borrowed from an friend years ago, but completely forgot about the book. You haven't talked to this friend for years because they moved to another state and so you don't see that person anymore. So you find this book and you are now thinking about the person. "I wonder what they are up to?"
    • Then it begins. Instead of calling the person and saying: "Hey I found your book! What are you up to? Are you still living in ___? Are you still dating ____? How is your family?" You hop onto Facebook, search for their name, scan their profile page, scan their photos, maybe even search through their friends list.
    • Then you get distracted by something else on the internet and your connection with that person has ended. They don't get their book back, you don't plan out a trip to visit them, you are missing some key piece of information from them (like their dad passed away, or they just got engaged) that they never had the chance to post on Facebook.
Anyway, after making this "big" decision it left me with one question.
"Now what?"
What am I going to do with my left over time not spent on Facebook. I'll just have to increase the time I spend on Tumblr, Imgfave, Pinterest, Xanga. But really, that's going to get soooo boring. 
Each of those pages have a purpose. Mostly they are for finding photos, foods, and crafts that interest me. I'll take the pictures and recipes, favorite them, and reblog them. Sometimes I will write long rants on Tumblr, but mostly Xanga, and then it's over and I go onto the next thing.
I don't ever make the food or crafts I see. I just find the pictures and share with people.

I want something new.

That's where this blog comes into play.
I want to actually recreate those things and post them here. I'll take pictures of the progress of crafts and foods, I'll write about new places I've been to, new foods I've tried, new people I've met.
This is not another site with the random things I like.
This is the Random Things I Do.